Friday, 10 December 2010
Animation of the gardens
I used a free camera and the set key function to move around the flowers. Unfortunately despite using a network render there was no time to edit the frames within Premiere pro.
Animation of seal colony at Walton cliffs
The cliffs, ocean and seals were merged into one scene. The seal was duplicated and a target camera placed on a path to go around the seals. Following feedback from the presentation I zoomed the camera in closer to the seals and sped up the timeline.
The gardens
I created a plane and used the sub object material editor to apply different materials to various sections i.e. grass, soil and a path. The individual flowers were then merged into the scene. Each flower was then duplicated using the array tool. This proved to be extremely time consuming and often too much the computer to cope with as 3D Max kept crashing. I added some omni lights to the scene and a camera. I originally placed the camera on a path constraint to go around the flower bed but the camera was either too close or too far from the flowers. I added an image (previously edited in photoshop to include the path) onto a background plane and adjusted the grass material on the ground plane accordingly. However this method of trying to blend in the ground plane with the background did not work as well as I hoped.
 |
| screenshot of garden scene |
 |
| render of garden scene |
 |
| render of garden scene |
Lily
To make this flower I used the taper modifier on a cylinder. The end caps were removed from the cylinder then the transform handle placed at the base of it with the adjust pivot only mode. Using soft selection on the top of the cylinder a taper modifier was added so that the cylinder would fan out at the top. A second taper was used on the z axis to create the lip of the flower. For the stamen a cylinder was edited then duplicated and placed inside the flower cylinder. Appropriate diffuse colours were used on the parts of the flower
 |
| screenshot of lily |
 |
| render of lily |
Daisy
A cylinder was used for the stem with the extrude tool on the top section to create a cup shape. A hemisphere was placed within this cup shape. The segments of the sphere were kept at 32. All the sphere edges were selected then extruded to give texture. For the petals I used a thin box 3 faces wide. The edge vertices were edited to create a more rounded shape. The edges running down the centre were then extruded inwards to give more definition to the shape, followed by a bend modifer. Appropriate material was added to the parts of the flower, which was then grouped together and a further bend modifier applied.
 |
| screenshot of daisy |
 |
| daisy |
 |
| close up of daisy |
Rose
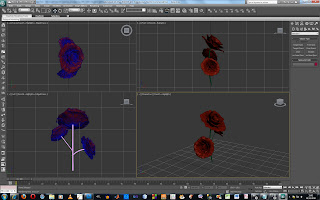
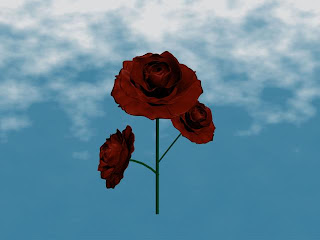
To make the rose I drew out the shape of one side of a rose using the create line tool, with 5 vertices. A lathe modifier was added to fill out the shape of the petals on that side. This was then copied and rotated around a central point moving about an eighth of the way each time, until the circle was completed.
A cylinder was added for the stem. The rose head and the stem were grouped together, copied twice and positioned to make a rose bush.
A cylinder was added for the stem. The rose head and the stem were grouped together, copied twice and positioned to make a rose bush.
 |
| screenshot of rose |
 |
| rose render |
The gardens
To make the gardens I decided to model 3 different types of flower:
- Rose
- Daisy
- Iris
The ocean
OCEAN.
A plane was added to the scene for the water. The renderer was changed from the default scanline to mental ray. In the material editor Arch and Design was added to the plane. The colour was changed to one more suitable for an ocean. Under the bump map parameters an ocean lume material was added. The settings within the ocean lume were altered to give the effect of waves. To animate the waves I added a noise modifier to the plane and then used auto key to change the phase values from beginning to end.
 |
| ocean |
The seal
Starting with a basic cylinder I deleted the end caps then used the shift+move tool along the borders to create the basic body shape. At the tail end the vertices were welded together into a point and then rounded off using soft selection and editing the edges. The flippers were created with the extrude tool then the vertices edited to give a more rounded look at the extremities. At the head end the vertices were also welded into a point then pulled out to create the nose shape. Several more segments were added to create a rounder shape. The nose itself was created by bevelling the edges inwards. Using the bevel tool the polygons were inset then extruded into the head to create the mouth area, the excess polygons inside the mouth were deleted and the create tool used to join up the edges for the top and bottom of the mouth. The mouth proved to be the most difficult trying to get the shape right. Although the shape seemed to be correct, when the turbosmooth modifier was added the mouth pulled out of shape and consequently took a lot of editing to get it right. Eventually I deleted all the polygons inside of the mouth then added a shell modifier with a small outside amount followed by the turbosmooth modifier. This gave a more rounded effect to the seal in general and especially the mouth and nose. Finally I used the create line to draw out some whiskers.
Material:
Sub object mode was used to divide the seal into three parts: the eyes, the nose and the skin. The eyes were coloured black with added glossiness and specular colour, as was the nose but with different settings. The body was coloured using a cellular map with a high glossiness and slight specular highlight.
 |
| Main body shape |
 |
| flippers extruded and rounded off, as well as nose area. |
 |
| nose / mouth area still needs a lot of work |
 |
| Screenshot of finished seal with whiskers |
Walton cliffs and seal colony
This scene consited of 3 model items:
- The seal
- The cliffs
- The ocean
Sunday, 14 November 2010
Wednesday, 10 November 2010
reference pics
 |
Route travelled to take reference photos of seaside, countryside and castle |
| Walton on the Naze |
 |
The Naze tower |
 |
| Walton on the Naze |
 |
| Walton on the Naze |
 |
| Essex countryside, Wrabness |
 |
Essex countryside, Wrabness |
 |
| Essex countryside, Wrabness |
 |
| Essex countryside |
 |
| Essex countryside |
 |
| Essex countryside |
Colchester Castle |
Colchester Castle |
 |
| Colchester Castle |
Colchester Castle |
Wednesday, 3 November 2010
Footpaths in Essex
There are over 3800 public rights of way throughout Essex, both circular and bi-directional. The longest one is the Essex Way which is 81miles long and runs from Epping to Harwich.
Publications for the various public rights of way can be found at: http://www.essexcc.gov.uk/vip8/ecc/ECCWebsite/dis/guc.jsp?channelOid=16098&guideOid=16090&guideContentOid=121501
Publications for the various public rights of way can be found at: http://www.essexcc.gov.uk/vip8/ecc/ECCWebsite/dis/guc.jsp?channelOid=16098&guideOid=16090&guideContentOid=121501
Wednesday, 27 October 2010
Essex Walkthrough
The decision was made to create a walkthrough of Essex, which will show its diversity from nature walks through to the larger towns.
Over the next week we will research reference photos of areas which we think should be included, also routes of footpaths to see how we can tie the different areas in together.
Over the next week we will research reference photos of areas which we think should be included, also routes of footpaths to see how we can tie the different areas in together.
Subscribe to:
Comments (Atom)


